Building a Support Tickets Entity
An entity is the primary element for storing data, similar to tables in databases. They are defined in each system to represent different sections or elements. For more information about entities, refer to Entities.
Adding a Support Tickets Entity
To build an entity within the Customer Support module that includes operations on support tickets, follow these steps:
- Click on the Customer Support module.
- Click on the Add Entity button.
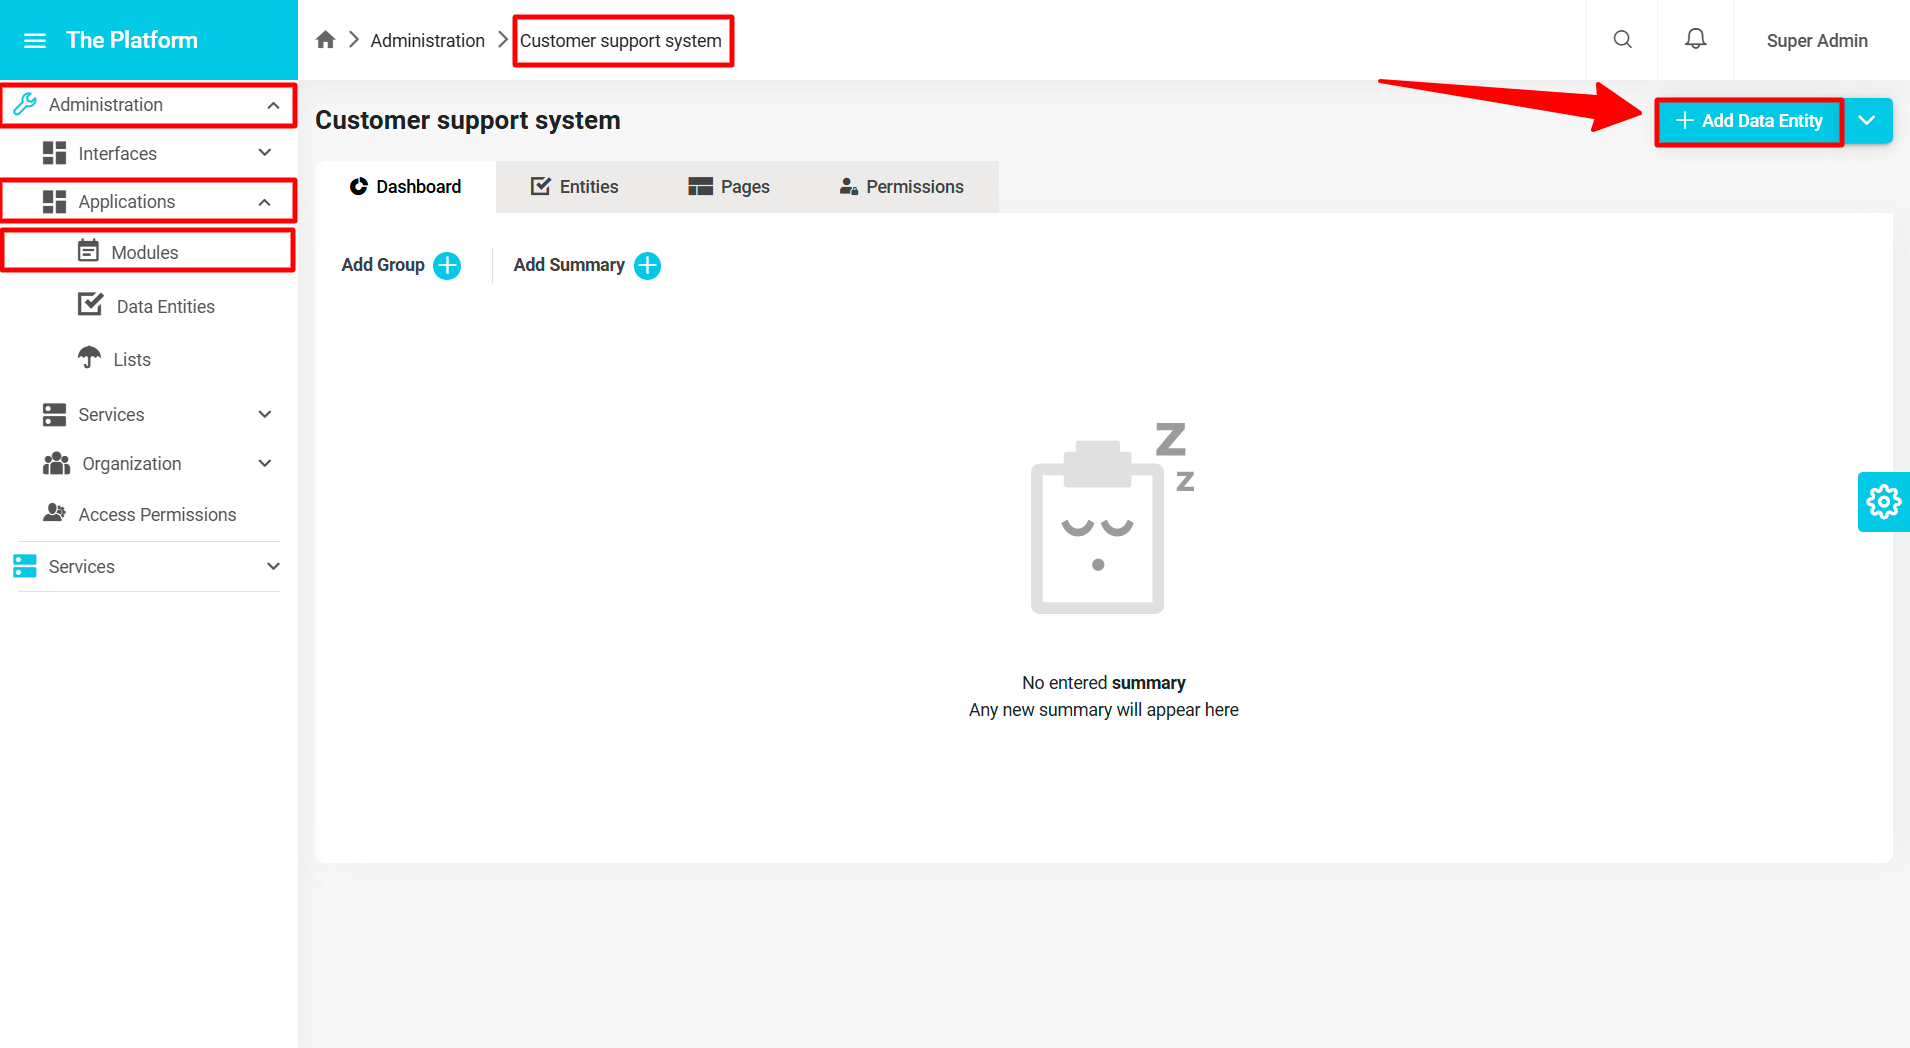
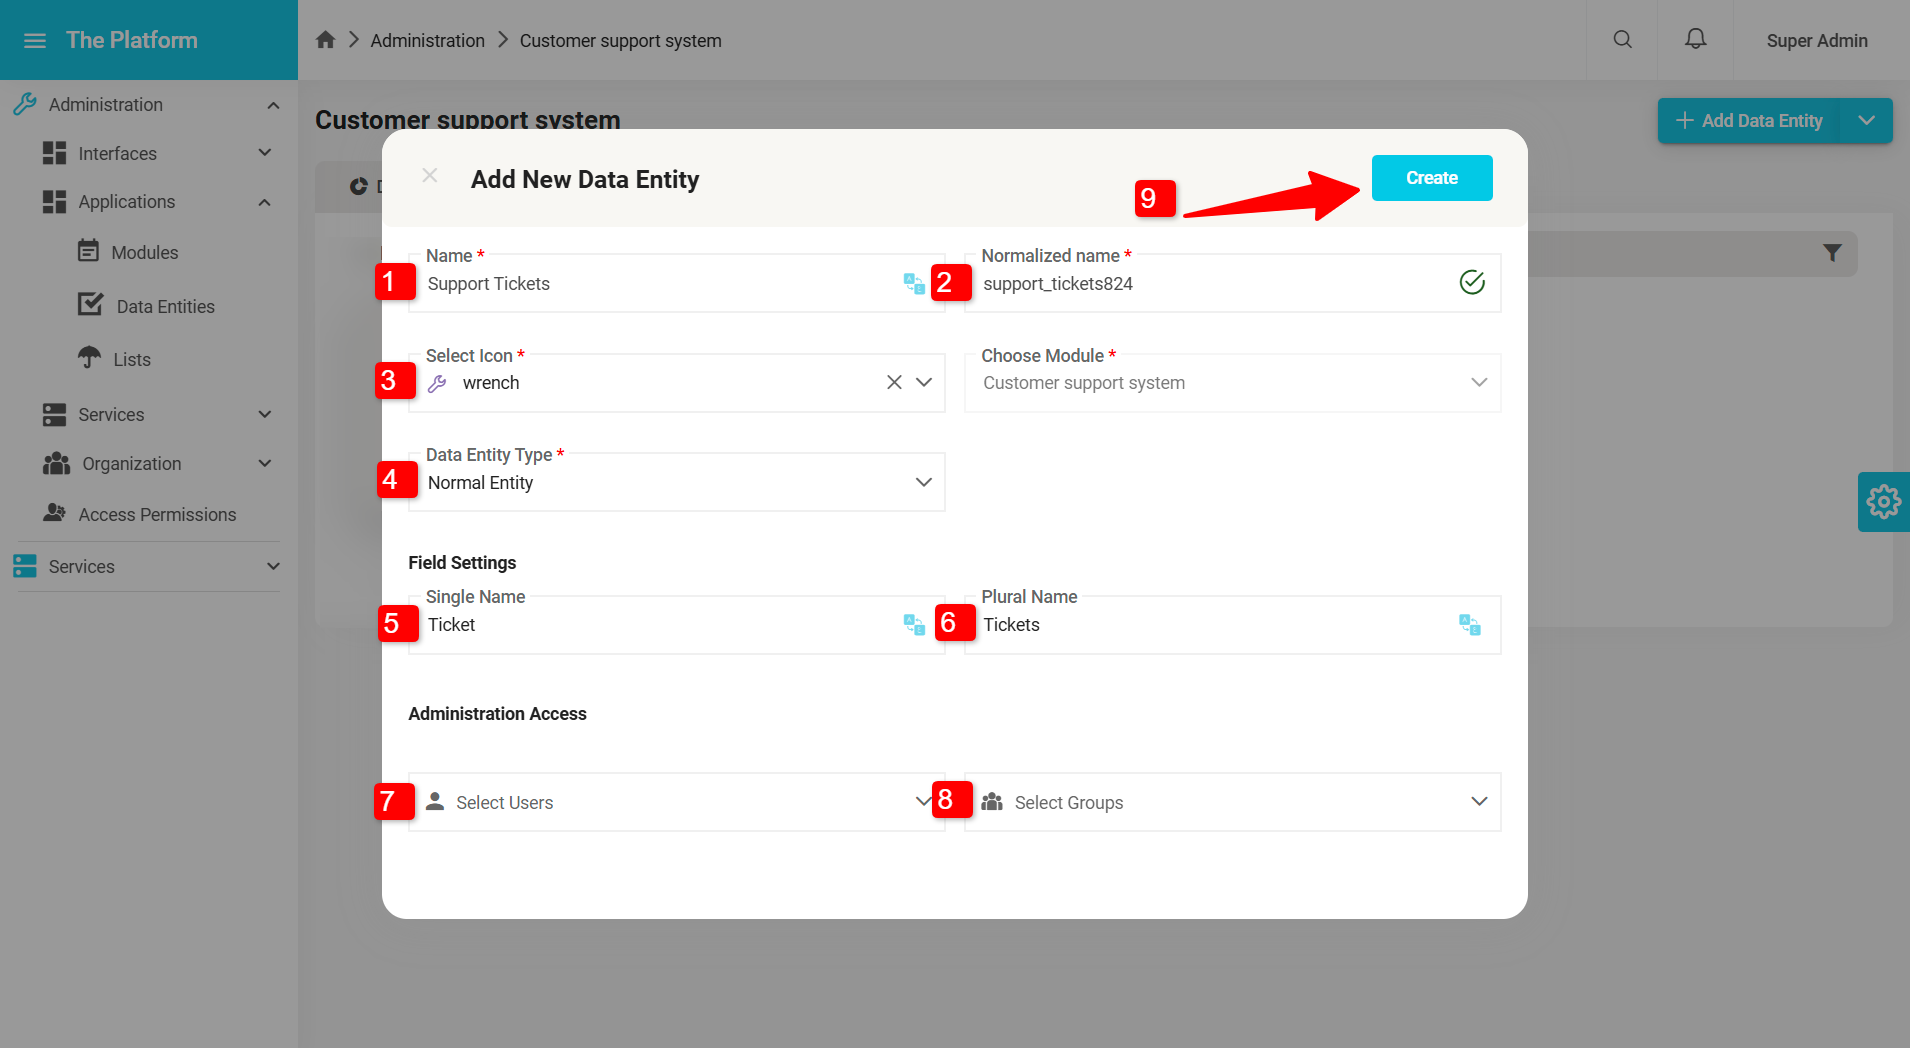
A window for adding an entity appears, where you need to fill in the entity information:
- Name (Mandatory): Name it "Support Tickets" in both Arabic and English.
- Icon (Mandatory): The system administrator should select an icon for the entity; let's choose the "wrench" icon.
- Entity Type (Mandatory): The system administrator should define the entity type. In this case, it will be "Natural Entity". For more information on entity types, refer to Entities.
- Model Field (Mandatory): This field is generated automatically once the entity name is entered in Arabic or English, but the system administrator can modify this field. It cannot be left empty. For more information on the model field, refer to Model Field.
- Unit Field (Mandatory): This is a locked field that cannot be modified, automatically filled with the unit name where the entity is created, "Customer Support System".
- Singular Name (Optional): This is the singular name of the entity entries, which will be "Support Ticket" in both Arabic and English.
- Plural Name: This is the plural name of the entity elements, which will be "Support Tickets" in both Arabic and English.
- Permissions Management (Optional): The system administrator can control the entity's permissions as needed. For more information on permissions, refer to Permissions.
- Click the "Create" button to create the "Support Tickets" entity.
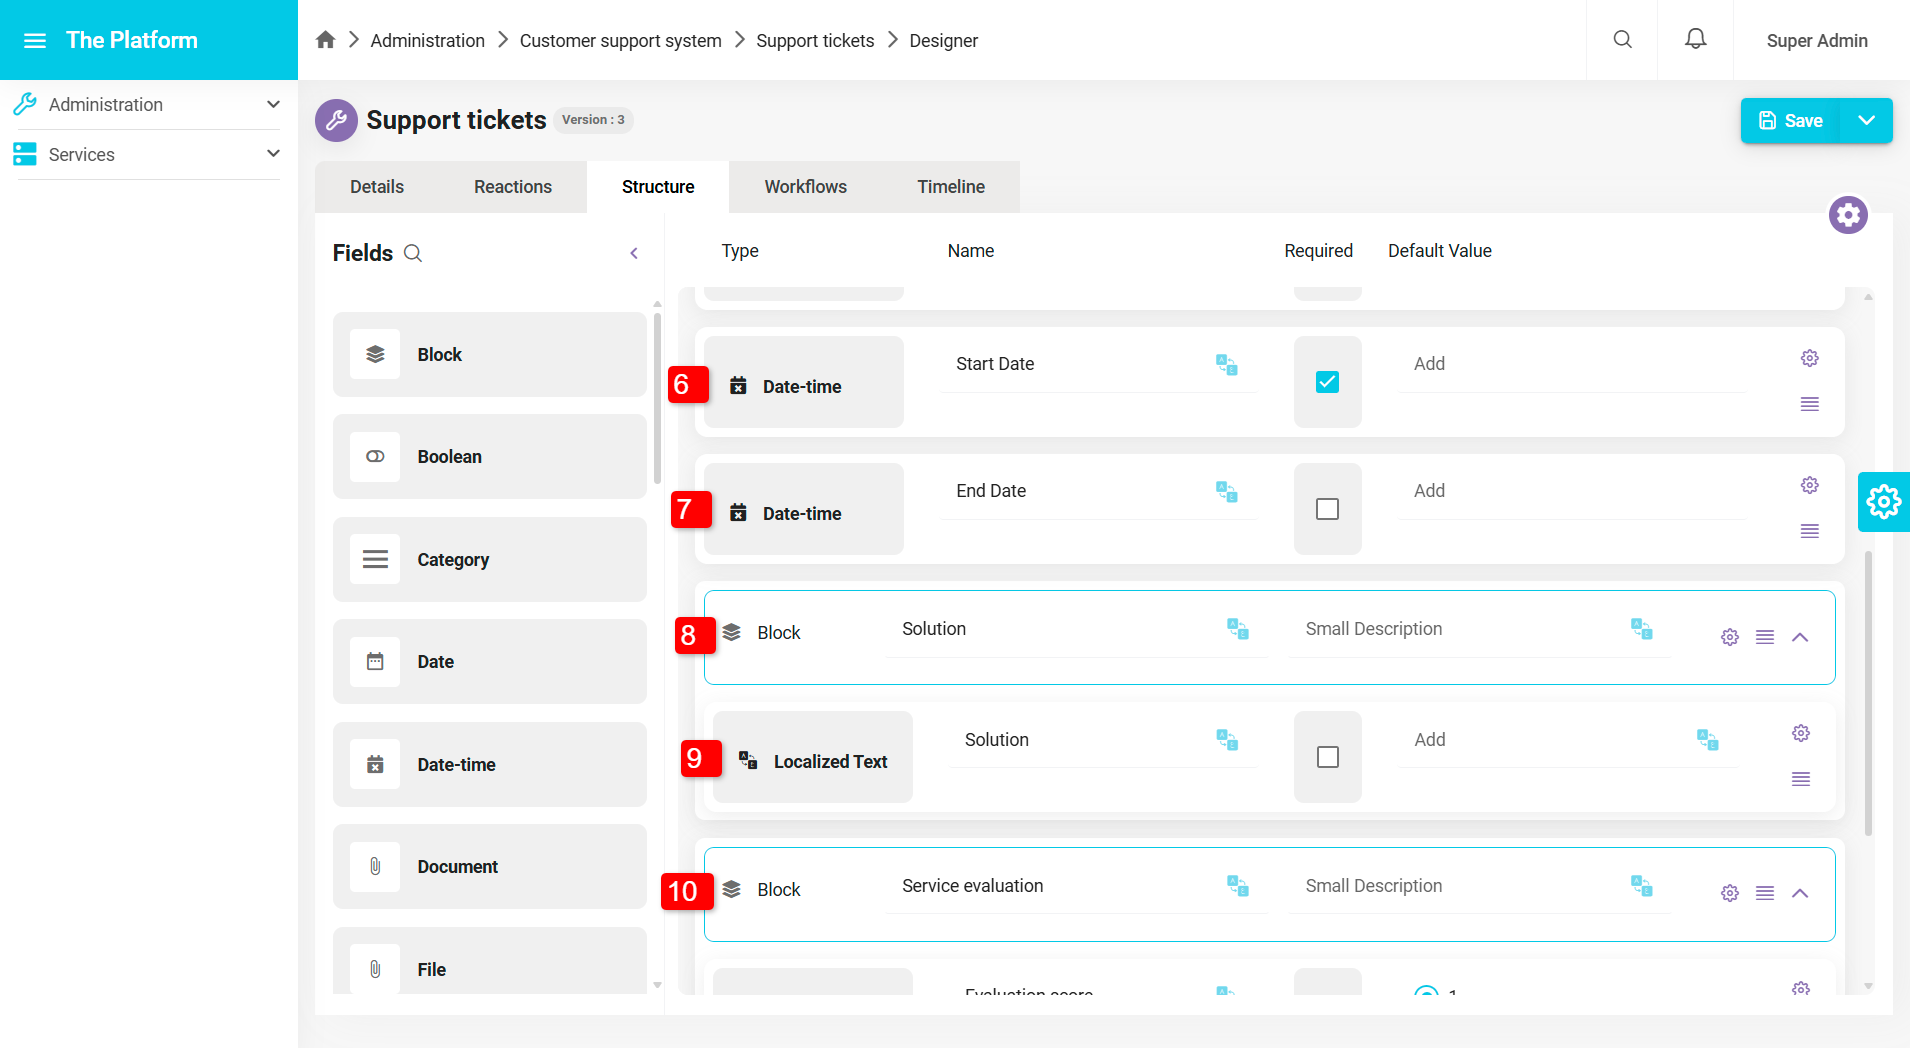
Adding Entity Structure
Once the entity is added, the user is directed to the entity details page. To build the entity structure, follow these steps:
- Click on the Structure tab.
- An empty page appears.
- Drag and drop the structure fields into the empty area. The fields are as follows:

- Ticket Number (Sequential Field).
- Ticket Title (Multi-language Text).
- Ticket Description (Multi-language Text).
- Ticket Status (Classification): Status options (Open, In Progress, Responded, Duplicate, Closed).
- Assignee (User).
- Ticket Opening Date (Date and Time).
- Ticket Closing Date (Date and Time).
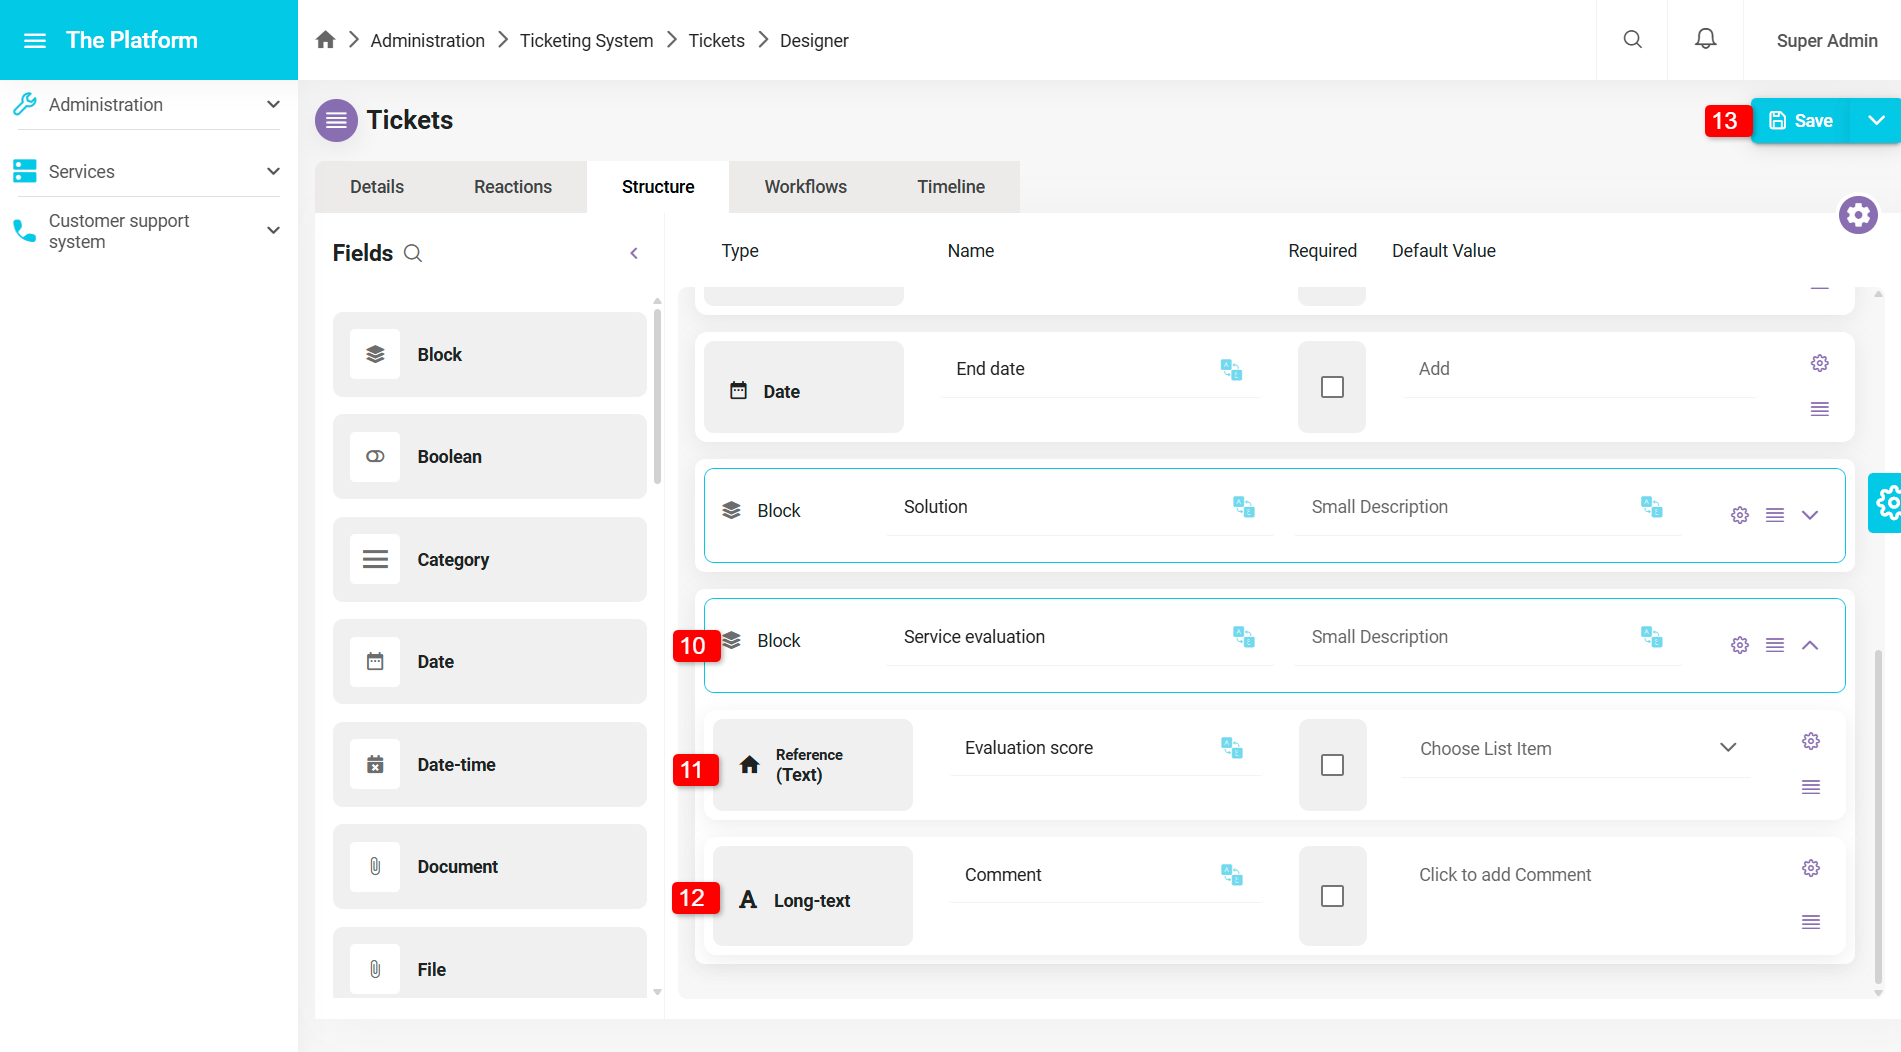
- Solution (Block).
- Solution (Multi-language Text).
- Service Rating (Block).
- Rating Score (Converter): Add rating options from 1-5.
- Comment (Multi-language Text).
- Click the "Save" button to save the structure of the "Support Tickets" entity.

Adding Workflow:
To build a workflow for the entity, follow these steps:
- Click on the Workflow tab.
- The workflow page appears.
- Click on "Click to activate the workflow" in the middle of the page to activate the workflow.
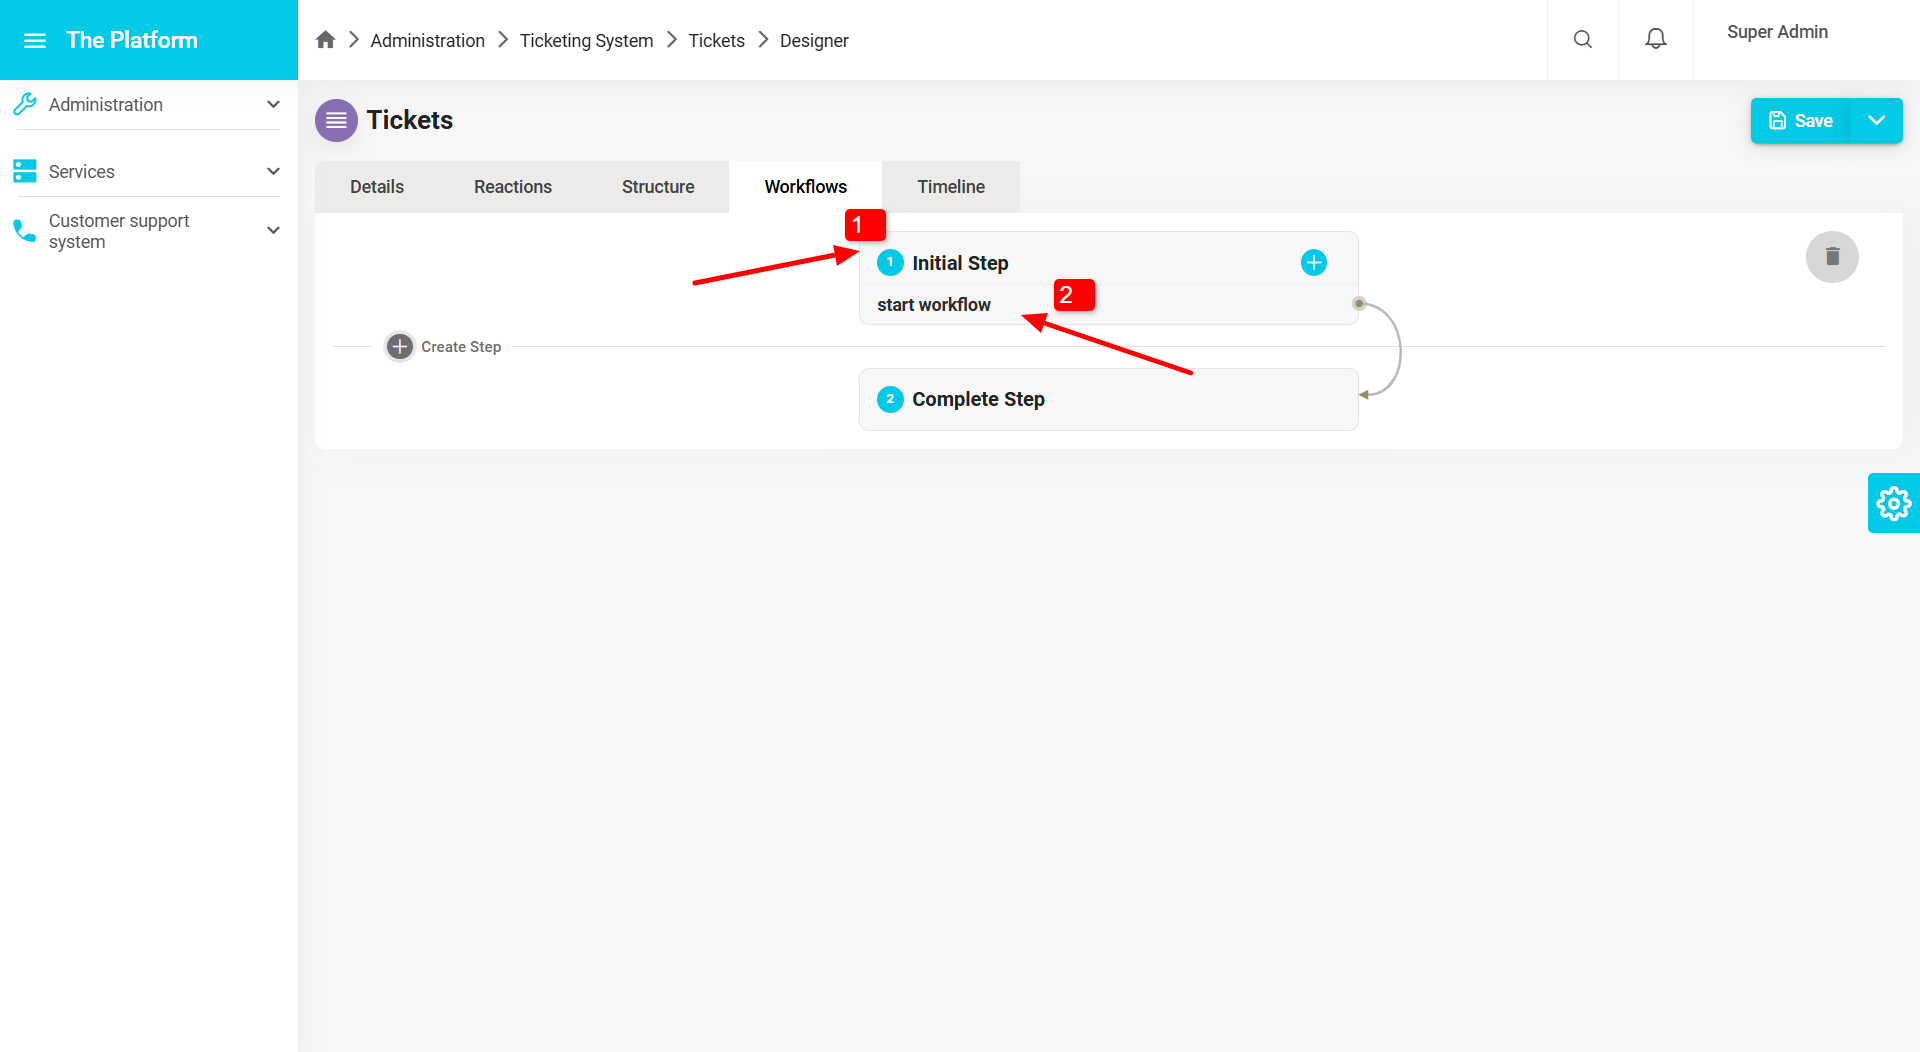
- Click on "Start" to change the step name.
- Workflow step settings appear.
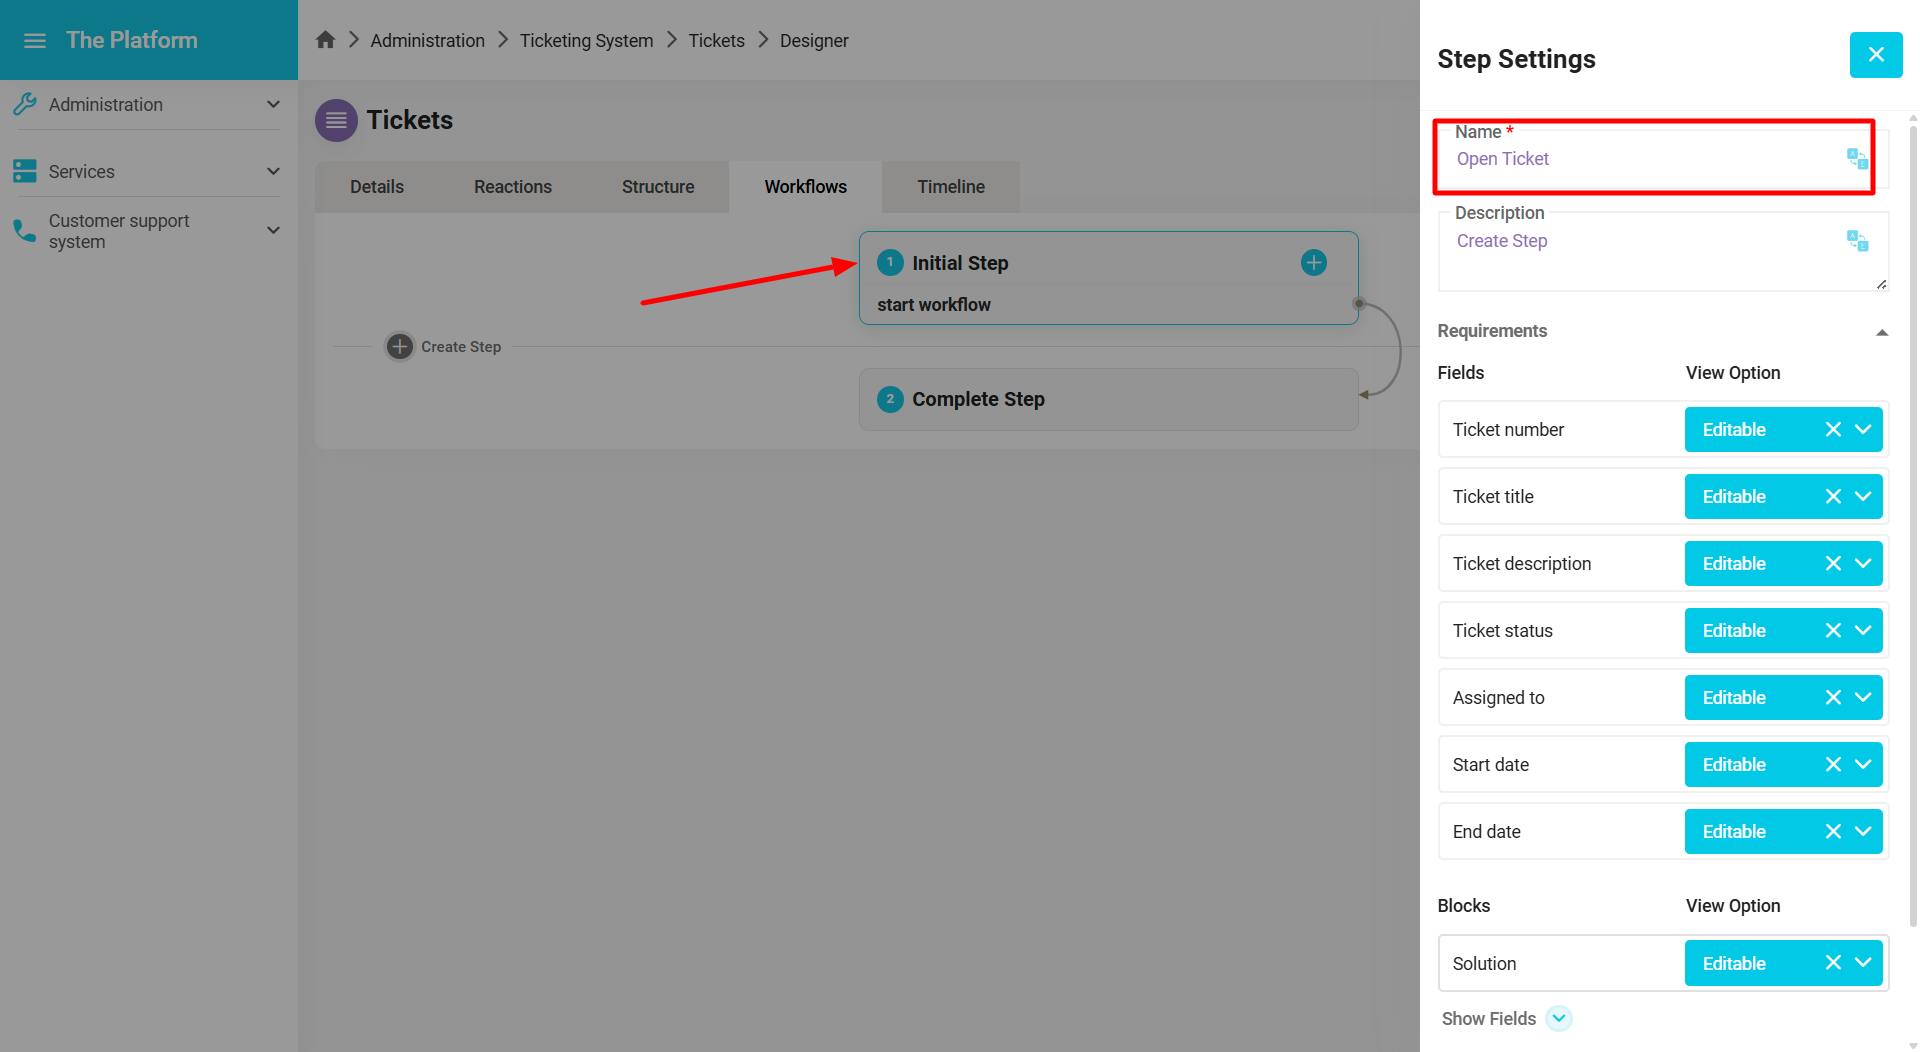
- Change the name "Start" to "Open Ticket".
- Change the action name "Start" to "Submit Request".
-ea004e4a6fa7b964540d151b2219c33c.png)
- Change the field settings in the step by clicking on "Open Ticket".
- Click on "Editable" to display field options and select what you want to display.
-51f08483a0ea164fbbc59774fa72e7de.png)
-8e9a3ec0daa1882dc93007cdf181c55f.png)
- Build the second step, "Support Desk", by clicking on "Add Step".
-a14a3eaec7bfc7942dbb115e0fca2b41.png)
- A popup window appears to fill in the step information.
- Click the "Finish" button to save the step.
-b2ab61b5292d52eb9c987d11134976eb.png)
-0d36f3ceec6ed7620c622469b038632f.png)
To delete a step, click on "Delete Step".
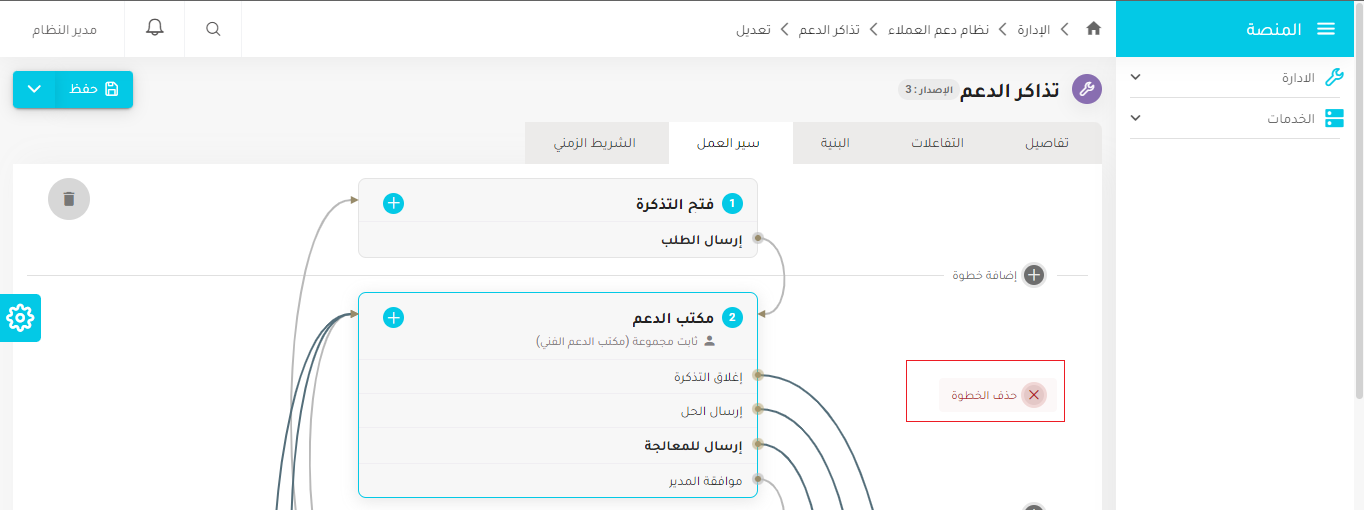
Change the name of the main action to "Send for Processing" as done in the first step.
-ecd214e8bae1a10554e3840b715e3948.png)
-e1d648cdb70a10cb177abc029b537367.png)
- Build a new step, "Ticket Processing", by following the same steps as before.
-c08e3135f2c320f8df9bb77036f88560.png)
-214d4abd08d499d4a98d77ea66d41b0a.png)
- Change the name of the main action to "Review Solution".
- Change the target step to "Previous Step".
-07f7ebeaa67dab5ccefda109aabfc7e1.png)
- Add a new step, "Service Rating", by following the same steps as before.
- Change the name of the main action to "Rated".
- Change the target step to "Support Desk".
- Change the field settings for the "Service Rating" step.
-6573ce4134cb165ac11faed5d6b99c38.png)
-aad7567e1bc8b0fa538cf3c4d8448434.png)
- Change the target step in the "Send for Processing" action in the "Support Desk" step to "Ticket Processing".
-38265c0bb33f894a5cd111a4d89e79a5.png)
-13fee89fd45256701ed68ae6b4022bc6.png)
- Add a new action "Close Ticket" by clicking the + sign at the top of the step.
- A popup window appears to fill in the action information.
-7f6c35bc81302287a63da318857c4de5.png)
- Add a new action "Send Solution".
-a7810790f7c0785b4158d11ef4ebdcbb.png)
-9cc1126c95a92771759f5691e3a7e39d.png)
- Build a new step, "Manager Approval", by following the same steps as before.
- Change the name of the main action to "Approve".
- Change the target step to "Previous Step".
-0cd39bcce10d5515769c64779e682495.png)
-7a559a763b4e9971bb2f3ead24c90847.png)
-7fc7d469de5eb853c141c44bba7ae386.png)
- Add a new action for the "Manager Approval" step called "Reject" by following the same steps as before.
-3f1d8e3d57e85022fda73357e749b68c.png)
- Add a new action in the "Support Desk" step called "Manager Approval" as done before.
- Click the + sign at the top of the step.
-feed9af42d56b0f5acb95442e68f5079.png)
- Change the field settings of the "Support Desk" step.
-1dad5b7e4d104f0055ac8af7d3fdf1ee.png)
-8d745a44e5b7ec2d054825ecb770ea90.png)
- Change the field settings of the "Ticket Processing" step.
- You can also delete a step by clicking on the "Delete Step" button in the step settings.
-cc77ffa33173664874792fcb43165def.png)
-19c5a3c012043527e9902096ea74f511.png)
- Click the "Save" button to save the workflow.
- To delete the workflow, click on the trash can icon at the top of the workflow.
-c767f01474c64397001b4f07d6983060.png)
For more information about workflows, refer to Workflows.
Adding Reactions
Reactions allow you to set up notifications and send them to the concerned parties. To add a notification, follow these steps:
- Click on the Reactions tab on the entity details page.
- Click on the + sign.
-2eb0fcb638c430d1c20d0b8fa3207569.png)
- A popup window appears to fill in the reaction information.
- Add a reaction called "Customer Response".
-71a38a7c4a2135f5c90ca4617edd393c.png)
-033f841db557b6bd8ef9755ab1a5d7a5.png)
-75c772bb4293c6e738c327a0512eb642.png)
- Add another reaction called "New Ticket Arrival" by following the same steps.
-81fef309275db245ac930a767b34539a.png)
-06b39b0f45703a142150b44d71280db3.png)
-f96219a3ef85211236d723eae42b1a0f.png)
- Add a new reaction called "Ticket Assigned to You" by following the same steps.
-d855dcbcf024bd00c46a8b561a823acd.png)
-6759db2260170df34bc99f31620972c9.png)
-78df4fd33dae14f90b00715b0e596766.png)
- Add a new reaction called "Solution Review" by following the same steps.
-f8c95f02757151974f01a62f3a9aa8bf.png)
-ba7214257182a067e5769858525c40b0.png)
-cce6c895ec6a9bf986f96906946dd256.png)
- Add a new reaction called "Solution Reviewed".
-9787923f0d088697633dea102c00bcdf.png)
-a08951f213502102b32a4a9f733dee83.png)
-9222cf90ac2dc201ea557c3c92b18d29.png)
- Add a reaction called "Request Solved".
-9f01f79614d00f0b4a97d78ec3c707f8.png)
-90828e56a6a3b424213cac7ccecd6b32.png)
-7fdbd1eb2239e675c384bb4520816020.png)
- Add a reaction called "Service Rating".
-ab8adac423ff063e9db397ee7ac42886.png)
-d686d45614f086e6bad3de8afba32f03.png)
-9cdbc4643cdd55797b58345ae65d1e9f.png)
- Click the "Save" button to save the reactions.
-a9b880048b6fa07ffa7a0fd84a0b654c.png)
For more information about reactions, refer to Reactions.